ARTILLERY REGISTER |
|||||||||||||||||||||||||||||||||||||||||||||||||||||||||||
|
|
||||||||||||||||||||||||||||||||||||||||||||||||||||||||||
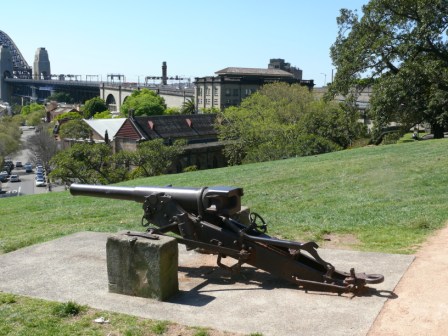
| Historical Specifics: | The gun was originally placed near the Botanical Gardens. When it fell into disrepair the veterans of the South African War rallied to save it and gained permission to have it placed near the South African War Memorial at Observatory Hill.
This gun was one of eight used by the Transvaal Staatsartillerie. The first six were ordered in 1895 and a further two in 1896. Grouped into two mounted batteries of four guns each they formed the: "2de en 3de Rijdende Battery". The gun is easily identifiable by its horizontal sliding breech block systems, which opened to the right. A cartridge case was used to help in obturation, i.e. to prevent the escape of gases to the rear. This also allowed for a rapid rate of fire, which, combined with its use of smokeless powder, made it a true early QF gun. It has a ridged carriage with no buffer. This specific gun (No.2) is the only known survivor of its type in the world. The exact date and location of its capture is not certain. 75mm Krupp QF (Feldkanone L/24) The Transvaal 75mm was equipped with a newer half turn, screw operated square horizontal sliding breech block which opened to the right. Instead of having a friction tube vent similar to that of the Free State Krupp, this gun’s breech block was equipped with an axial mounted firing pin. A brass cartridge case was used for obturation, i.e. to prevent the escape of gases to the rear, which also allowed for a quicker rate of fire, i.e. quick firing. The gun was still mounted on a rigid carriage without a recoil buffer system. Wheel brakes and a foldable trail spade were used to assist in recoil control, but these were not really adequate. Elevation was affected by means of a geared hand wheel protruding at an angle behind the breech. The carriage was light and sturdy and stood up well to the rigours of the African veldt. The assembly was known for its reliability and ease of movement, seldom requiring more than basic maintenance. The brass cartridge cases were filled with “ballistite” smokeless powder, and coupled with the gun’s small carriage and low mounting, made it ideal for Boer camouflaged gun tactics. Right trunnion mounted front and tangent rear sights were used to lay the guns. Ammunition consisted of ring segment, shrapnel and case shot with percussion and time fuses. Shrapnel was of cast iron and therefore contained fewer bullets than British or French shrapnel shells. Although the German fuses were more reliable than those of other manufacturers their range was shorter which forced the Boer gunners to answer shrapnel shell with segment shell during long range duals. Although outdated by European continental standards at the turn of the century, in Boer hands this gun was superior to the British 15 and 12-pr BL guns fielded against it.At the outbreak of the war one battery of guns was sent to the Natal Front, while the second was sent to the Western Front. Here the guns saw extensive service during most of the sieges and battles around Mafeking, Ladysmith and Kimberley. Later they were also employed in the early battles in the Eastern and Western Transvaal. They were captured or discovered destroyed at:
According to War Office document WO32/8111 four of the eight guns were found: one at Paardeberg, two by Babbington at Zandfontein and Buisfontein and one by Bindon Blood on the Tautesberg (Steelpoort Valley). Post-war statements by officers of the Staatsartillerie indicated that the remaining four were all destroyed. Two or three were found blown up at Hector Spruit, while Captain Du Toit indicated that another QF gun was destroyed at Haenertsburg in October 1900. A carriage and a piece of a gun were found there in July 1902, but it is uncertain whether these actually belonged to the 75mm Krupp QF. In his war diary Fritz Rothman, a burgher who attached himself to the artillery, states that three Krupps were destroyed at Hector Spruit and that a single Krupp gun was blown up at Haenertsburg on 18 October 1900. Unfortunately he gives no indication of the calibres. Pieces of another gun were found on the Tautesberg in April 1901, but it is possible that these pieces belonged to the gun found by General Bindon Blood at the same place. WO32/505 makes mention of another possible gun of which only fragments were found near Reitz in January 1902, but the type and make of gun were doubtful. Except for the Paardeberg gun, which was sent to England aboard the Templemore on 6 August 1900, the barrels of three other captured guns (serial no. 1, 4 & 5) were shipped from Cape Town on 30 December 1903 aboard the SS Avondale Castle. On the same vessel were five Krupp carriages, ten Krupp wagons (serial no. 7 & thirteen without numbers) and fourteen Krupp limbers (serial nos. 1, 4, 5, 9, 11, 14 & four without numbers). It is not certain which of these were Transvaal Krupp and which were Free State Krupp equipment. Nine days before this vessel, another, the SS Dunolly Castle, also left Cape Town with ten Krupp wagons, eleven Krupp limbers (serial nos. 3, 8, & nine without numbers) and eight Krupp carriages (serial nos. 1, 3, 8 & five without numbers). Two more Krupp limbers (no. 2 & 11) were shipped from Durban on 10 October 1903 aboard the SS Inyati. In England the trophy guns and carriages were allotted to the following recipients:
Only one of these, No.2, the Paardeberg gun, is known to have survived and today it can be seen mounted at the New South Wales Memorial in Observatory Park, Sydney, Australia. This gun is in dire need of restoration and has already lost its wheels. Two breech blocks from the Transvaal gun survived in South Africa. A complete breech block that once belonged to gun No.4 can be seen at the War Museum of the Boer Republics in Bloemfontein. A second incomplete block (that was used as an anvil at some stage!) is preserved in a private collection in Pretoria. When abandoning a gun the Boer crews usually removed the breech block to render the gun unserviceable. Spare breech blocks were also carried in a wooden case in the limber of some guns. (Information provided by the Oranje Vrijstaat Artillerie Corps Historical and Re-enactment Group).
|
||||||||||||||||||||||||||||||||||||||||||||||||||||||||||
| General Information on Gun Type: | Nil. | ||||||||||||||||||||||||||||||||||||||||||||||||||||||||||
| Additional Photos: | 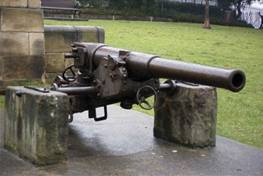 |
||||||||||||||||||||||||||||||||||||||||||||||||||||||||||